Saturday, 19 July 2014

How to Disable "Seen" In Facebook Chat?

How to Disable "Seen" In Facebook Chat?

There Is 2 Trick For Disable Seen Feature.
 

  1. Chrome Plugin:- Facebook™ Chat Privacy
  2. AdBlock Plus

    1. Chrome Plugin:- Facebook™ Chat Privacy Disable         Seen By / Seen On Option.


    Chrome plugins always make it easy,Previously we saw How to detect the Platform or CMS Used by a site and much later, we also saw ”  How To Detect the 
    WordPress Theme Name” Now its time for something new. This plugin doesn’t display the “Seen by xyz” and “xyz isTyping” in your chat. Just go to the Chrome Store and install this free plugin now now. Download Facebook™ Chat Privacy. You can find several alternatives in the Related Extensions page, or you can even go with this-  Chat Undetected For Chrome and Firefox.


    2. Adblock Plus To Disable Seen By/Seen On Option In     Facebook Chat-


    As i said you just have to block the URL of Facebook on your browser,So just go to your Adblock options page and then navigate to Filter lists.Now just add this URL into the Custom Filter List facebook.com/ajax/mercury/change_read_status.php$xmlhttprequest
    Once you add,just save it and check your Facebook account,you’ll see that the “Seen” and “xyz is typing” never appears! You can get the Adblock plus Here.


    Thanks to : legeeks


How To Know Who Visited Your Facebook Profile ?

How To Know Who Visited Your Facebook Profile ?


  • Go To Your Facebook timeline- facebook.com/xyz
  • Right click on your timeline and hit “View page Source”.
  • Now, you’ll be redirected to a new page with lots codes.
  • Hold CTRL+F on your keyboard, a text box appears at the right corner, in that box, type- “InitialChatFriendsList” (Don’t include Quotes)
  • Next to that word, you’ll see a list of numbers, these are the profile ID’s of people who visit your timeline.
  • Just go to “facebook.com”  and paste the ID number beside it with a “\” . For example, if the ID is abcd, you have to put it as- facebook.com/abcd.
  • The first ID shows the one who visits profile more often while the last ID never visits your profile!

Thursday, 10 July 2014

How to change IP Address with Security Kiss.

How to change IP Address with Security Kiss.

Security kiss vpn is a free and reliable vpn to change our ip address. We can use security kiss VPN on numerous platforms including windows, Linux, and Mac os. It creates an encrypted terminal and works as an elite proxy. Data, which we send from our computer goes from an encrypted terminal and receiver of the packets only get the server ip address, which we had selected while using security kiss.
SecurityKiss are a leading VPN provider to protect privacy, ensure anonymity and bypass Internet restrictions. A good news is for SecurityKISS still has a free plan for all Internet surfers. Although they have a free 300MB daily bandwidth limited for free users, SecurityKISS is a very good free VPN for security surfing. SecurityKISS can also be used for accessing Facebook, Twitter and other blocked sites. Since watching Youtube videos needs a lot of bandwidth, a paid SecurityKISS membership is better for accessing Youtube.In this guide I will guide you from how to download SecurityKISS, install SecurityKISS and use SecurityKISS.Firstly Click here to download securitykiss.After Download install it.


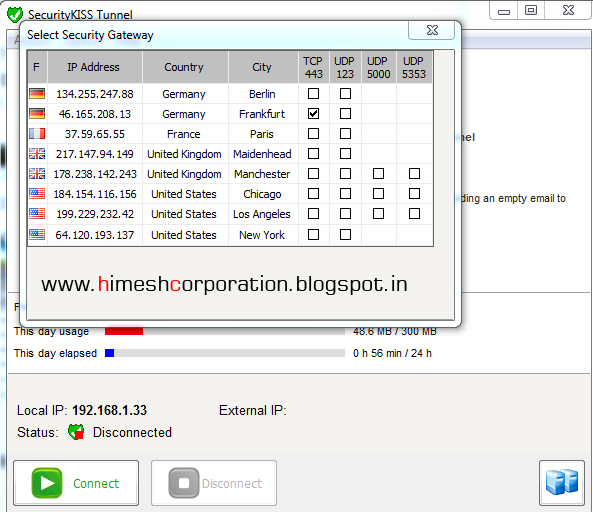
After Installation  Open security kiss and from menu bar click on “Option” and finally click on “change server”. A security kiss window will pop-up for server selection, Check mark any of the desired server.


Finally click on the big green “
Connect” Button to get connect with the desired server or in simple terms, to change your ip address. NOTE: If you are unable to connect with one server than, try to connect with another server. Please be patient while connecting to the SecurityKISS VPN server. After your computer successfully connected to the SecurityKISS VPN server, you can see that your external IP has been changed. and connected status in green.


You can change a the VPN server from the SecurityKISS control panel. You need to disconnect current connection and select a new server from the list. SecurityKISS has servers located in the US, UK and German and france.
  • Now You can go to Aplusproxy.com and check your IP before and after connecting to SecurityKISS VPN server.
  • You don’t need to change the configuration of your web browser and now you can access blocked websites.
  • SecurityKISS is an easy to use free VPN. They have US, UK, German and France servers for your choice. I would say this is a very good free VPN service.


Monday, 7 July 2014

The program can't start because the detoured.dll is missing from your computer. ( Fixed )

The program can't start because the detoured.dll is missing from your computer. ( Fixed )


In this post I would like to explain the method of resolving the issue of a missing detoured.dll file. When its missing from your computer a popup containing an error message was being displayed, every time when you trying to open either a Notepad, MSPaint, WinRar etc ....


How To Fix It:

 1. Download detoured.dll File Form - HERE
 2. Paste it into - C:\Windows\System32 and C:\Windows\SysWOW64
If You Use Windows 7, 8, 8.1 Or If you use XP just Put it into C:\Windows\System32 Only.
 3. Now Restart the system and The issue is Resolved.


Tuesday, 1 July 2014

Downloading Torrent Files Using Internet Download Manager.

Downloading Torrent Files Using Internet Download Manager.

1. First download the torrent file with .torrent extension which you wish to download from the internet directly without any torrent client like utorrent.


2. Now open zbigz.com and you will land on its homepage.

3. Then Click on upload Torrent and browse your torrent to transfer and click on Go.
4. Then it will ask you for Free or Premium service, choose Free to proceed further.
5. It will take some time to cache your file. Once the caching is done, click on transfer button to download your file as shown below.


6. You should have internet download manager installed on your computer so that download start inside IDM. If you don't have IDM don't worry it will download directly.

Note: If you decide on to use Free transfer then you wont be able to transfer file of more then 1 GB